Leave Management
Leave Management — Apply, Approve, and Auto-Mark Attendance (Student/Teacher/Admin)
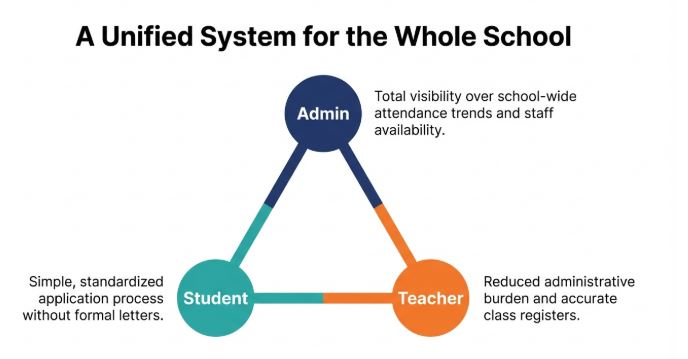
The Leave Module in InstaClass allows students, teachers, and school admins to apply leave for specific dates (with optional attachment proofs). Leave requests can be approved or rejected, and once approved, the leave is automatically reflected in Attendance—so parents don’t need to write handwritten letters and schools get a clear leave record.
1) Who can apply leave?
In InstaClass, leave can be created by:
✅ Student Leave
- Student (or parent using the student login) submits leave.
- Request is sent to the assigned teacher (usually Class Teacher) for approval.
✅ Teacher Leave
- Teacher submits leave.
- Request is sent to the School Admin / Management for approval.
✅ School Admin Leave
- Admin can also create leave entries (for exceptions or on behalf of someone, based on permissions).
2) What information a Leave request includes
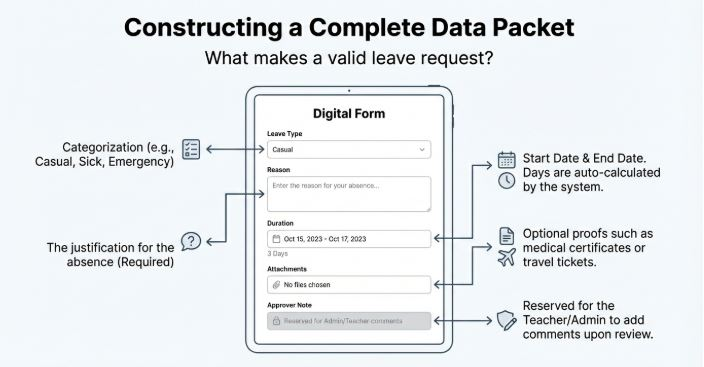
A leave request contains:
- Leave Type (example: Casual / Sick / Emergency)
- Reason (required)
- Start Date & End Date (required)
- Days (auto-calculated in most cases)
- Attachment (optional)
Example: medical certificate, travel ticket, note, etc. - Status
- Pending
- Approved
- Rejected
- Cancelled
- Approver Note (optional comment from teacher/admin)
3) How approval routing works
InstaClass routes leave requests automatically:
Student Leave → Teacher
When a student applies leave:
- It is assigned to Class Teacher / assigned teacher
- Teacher approves or rejects
Teacher Leave → School Admin
When a teacher applies leave:
- It is assigned to School Admin (Role)
- Admin approves or rejects
This ensures the right person is notified and responsible for approval.
4) Step-by-step: Student applying leave
- Login as Student (or parent via student account)
- Go to Leave
- Click Apply Leave
- Fill:
- Leave Type (optional)
- Reason (required)
- Start Date and End Date
- (Optional) Upload supporting document (medical proof, etc.)
- Submit
✅ After submission:
- Status becomes Pending
- Teacher receives the request for action
5) Step-by-step: Teacher approving/rejecting student leave
- Login as Teacher
- Go to Leave Requests
- Open the request
- Review:
- Dates, reason, attachment (if any)
- Choose:
- ✅ Approve
- ❌ Reject
- (Optional) Add Approver Note
- Save
✅ If approved:
- Leave status becomes Approved
- It will automatically show as Leave in Attendance for those dates (for that student)
6) Step-by-step: Teacher applying leave
- Login as Teacher
- Go to Leave
- Click Apply Leave
- Fill:
- Leave type (casual/sick/etc.)
- Reason
- Start & End dates
- (Optional) Upload proof
- Submit
✅ After submission:
- Status becomes Pending
- School Admin/Management receives it for approval
7) Step-by-step: Admin approving/rejecting teacher leave
- Login as School Admin
- Go to Leave Requests
- Filter by Teachers
- Review request details
- ✅ Approve / ❌ Reject
- Add note if needed
- Save
✅ If approved:
- Teachers’ leave status becomes Approved
- Attendance records can reflect leave based on your attendance rules
8) Attendance Auto-Mark (Important Feature)
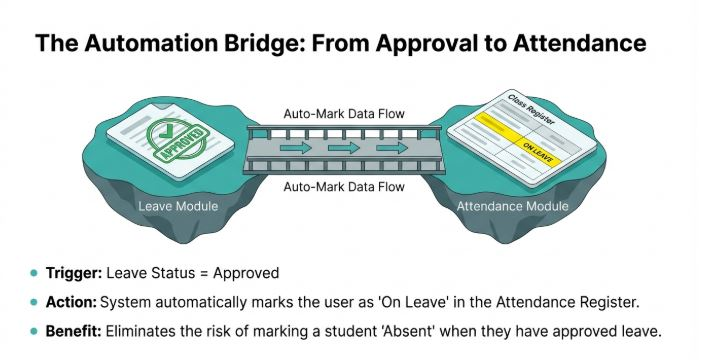
Once a leave is Approved, InstaClass automatically marks the person as Leave in Attendance for those dates.
What this solves
- Teachers immediately know which students are on leave
- Admin knows staff availability in advance
- Reduces manual errors in attendance marking
- No need for handwritten leave letters
Even if parents can’t write formal letters, InstaClass makes leave requests simple and standardized.
9) Cancelling a leave request
Depending on your school settings, a user may cancel leave:
- While it is still Pending
- Or before the leave dates begin
Status becomes:
- Cancelled
10) Common mistakes & best practices
Best practices
✅ Give a clear reason (e.g., “Fever – doctor visit”)
✅ Upload proof only when required (medical leave, etc.)
✅ Apply early for planned leaves
✅ Teachers should review leave before finalizing attendance
Common mistakes
- Selecting wrong dates
- Leaving reason blank (required)
- Uploading unrelated documents
- Assuming leave is valid without approval (status must be Approved)
11) Status meanings (quick reference)
- Pending → Waiting for approval
- Approved → Accepted and auto-marked in attendance
- Rejected → Not accepted
- Cancelled → Withdrawn by requester or school