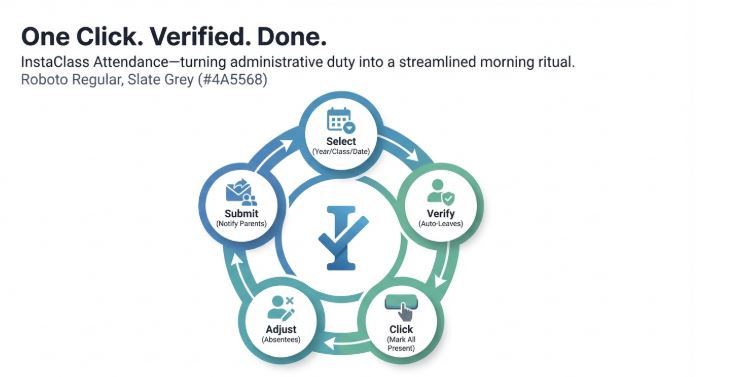
Attendance
Attendance — Mark in One Click, Auto-Leave Sync, Parent Notifications (Teacher/Admin Guide)
InstaClass Attendance helps teachers mark class attendance quickly and accurately. Teachers can mark attendance in a single shot (bulk present), approved leaves are automatically marked as Leave and locked, and parents can receive notifications once attendance is submitted.
1) Who can mark attendance?
Typically:
- Teacher (primary)
- School Admin / Super Admin (if permitted)
Attendance is recorded per:
- Academic Year + Class/Section + Date
2) What makes InstaClass Attendance special?
✅ One-click bulk marking (mark all present at once)
✅ Approved leave auto-sync (students with approved leave show as Leave)
✅ Locked leave rows (leave entries can be locked to prevent accidental changes)
✅ Draft vs Submitted (edit before final submit)
✅ Parent notification after submission
✅ Class strength visibility (present/absent/leave count)
3) How Attendance works (important concept)
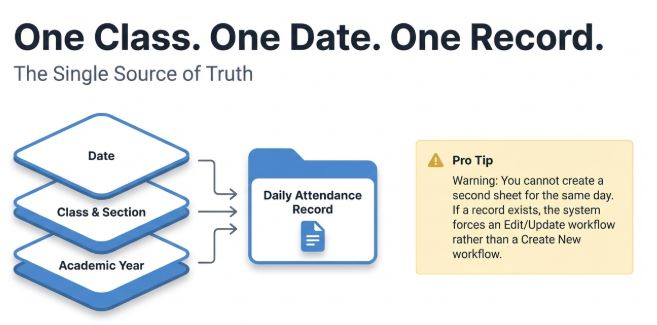
InstaClass stores one attendance sheet per day for each class/section.
⚠️ Important rule:
For the same Academic Year + Class/Section + Date, only one attendance record can exist.
So if attendance already exists for today, you will edit/update it (not create a second one).
4) Step-by-step: Mark attendance (Fast workflow)
Step 1 — Open Attendance
- Login as Teacher
- Go to Attendance
- Select:
- Academic Year
- Class & Section
- Date (usually today)
The student list will load automatically.
Step 2 — Check auto-marked Leaves
Before marking present/absent, InstaClass will automatically apply:
✅ Approved Leaves = Leave
- Students with approved leave for that date will show as Leave
- These entries may be Locked (cannot be changed)
- Lock reason is shown (example: “Approved Leave”)
This prevents errors and ensures leave is respected in attendance.
Step 3 — Mark all Present in one click
Use the bulk action:
✅ Mark All Present
This marks all non-locked students as Present in one click.
Step 4 — Mark absentees (quick adjustment)
If any student is absent:
- Uncheck that student OR
- Change status to Absent
You can also add a small note if required:
- “Sick”
- “Not reachable”
- “Late arrival” (based on your school policy)
Step 5 — Review class strength (attendance summary)
InstaClass shows a quick summary like:
- Present: 32
- Absent: 2
- Leave: 1
Total Strength: 35
This helps teachers verify attendance at a glance.
Step 6 — Save Draft or Submit
Attendance supports two stages:
Draft
- You can save and adjust later
- Useful if you are still verifying absentees
Submitted
- Final attendance for the day
- Locks the record for reporting (based on settings)
- Triggers parent notifications (if enabled)
✅ Recommended:
Save Draft → Quick re-check → Submit
5) Parent notifications (after submission)
Once attendance is Submitted:
- Parents can receive a notification that attendance has been marked
- They can see their child’s status (Present/Absent/Leave)
This improves transparency and reduces calls/messages to teachers.
6) Common scenarios
Scenario A: Many students are present (most common)
✅ Auto-leave applied → Mark All Present → Mark a few Absent → Submit
Scenario B: Student has approved leave
✅ System shows Leave and locks it → Teacher cannot accidentally mark Present
Scenario C: Teacher marked wrong by mistake
✅ If still Draft → correct and submit
If already Submitted → admin permission may be needed to edit (as per your school rules)
7) Best practices for accurate attendance
- Always confirm the correct Class/Section and Date
- Use Mark All Present first, then mark absentees
- Do not modify Locked leave entries
- Submit only after quick verification
- Add notes only when necessary (keep short)
8) Status meanings (quick reference)
- Present → student attended
- Absent → student not present
- Leave → approved leave (often locked)
- Unmarked → not updated yet
Attendance sheet status:
- Draft → editable
- Submitted → final (parent notification may trigger)